


How to solve air bubbles in perfect-bound products? A veteran perfect binding expert's comprehensive summary of experience!
With the continuous development of printing technology, wireless binding holds an important position in textbooks, educational aids, and book binding due to its high binding efficiency and low cost. However, the issue of hollow backs in book-bound products has long troubled various printing companies. This issue not only reduces the book's sturdiness and lifespan but also seriously affects its appearance quality, leading to customer complaints and returns, causing economic losses for the company.
With many years of experience operating staple linkage lines, I continuously study and deeply analyze the entire staple binding process. I will explore the causes of cavitation from multiple perspectives including equipment, processes, materials, and operations, combined with actual production cases, and propose suggestions for optimizing the staple process. The aim is to provide practical solutions for the printing industry and improve the overall quality of staple products.
The forms of cavitation in adhesive binding products
Voids in binding products mainly appear as obvious honeycomb-like small holes or bubbles at the top and bottom ends of the book, and pressing hard gives a bumpy feel on the spine. The specific manifestations are as follows:
01/ Uneven distribution of hot melt adhesive
As shown in Figure 1, in the cured adhesive layer, obvious bubble-formed voids can be seen, or in some areas, there are no blank spots covered by the hot melt adhesive at all. Bubbles cause insufficient bonding area in this area, while hollow areas completely lose bonding strength. Splitting the book open from the middle of the spine, you can see that parts of the spine are either not covered with hot melt glue or are insecure, with voids.
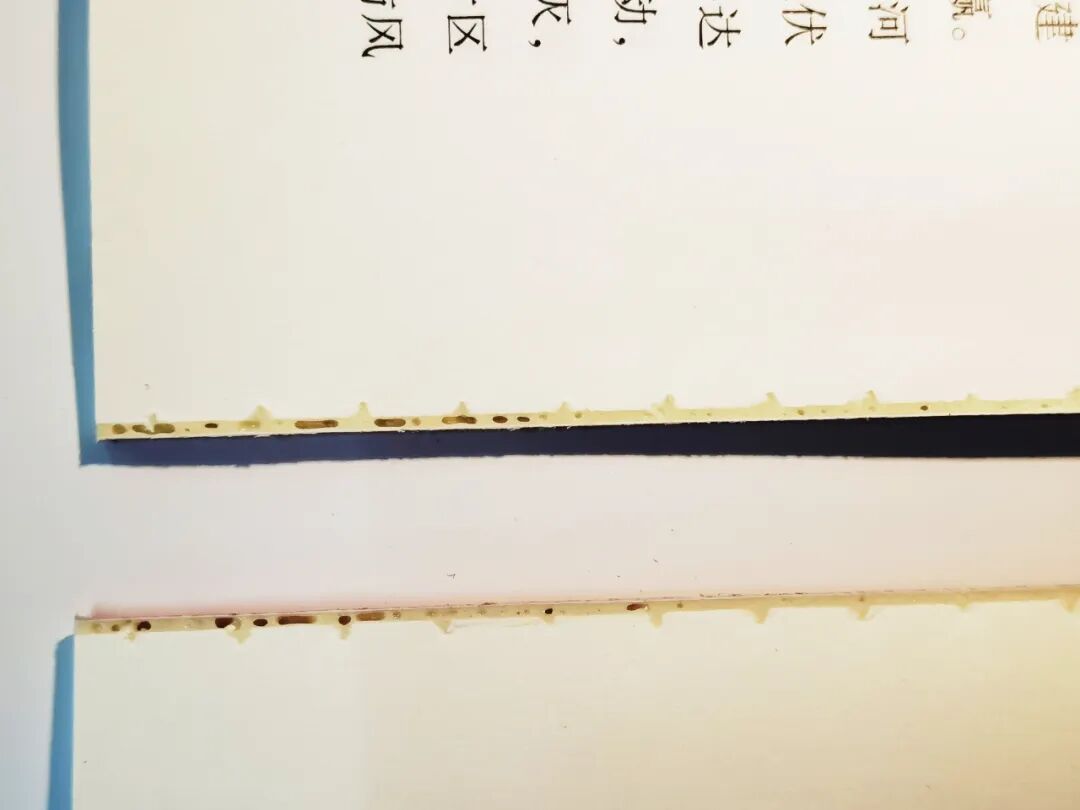 Figure 1: The glue in some areas of the book spine is thin, with voids.
02/ Inconsistent glue layer thickness
This issue causes the surface of the book spine to be uneven (wavy), specifically manifested as irregular bulges, bumps, or depressions on the cured book spine, instead of a smooth and uniform surface (as shown in Figure 2). There may also be noticeable differences in glue layer thickness at the top and bottom edges (as shown in Figure 3).
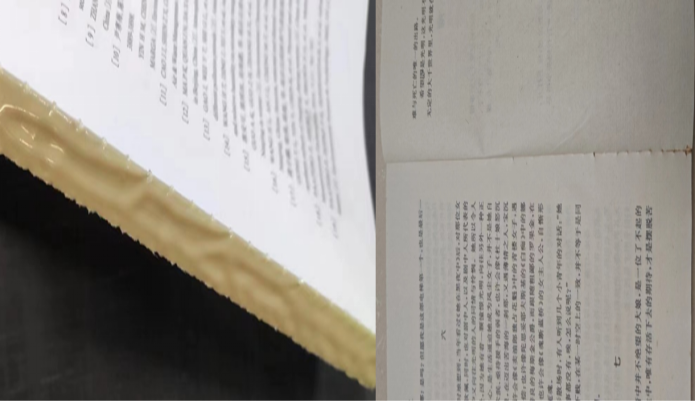
Figure 2 Uneven surface of the book spine
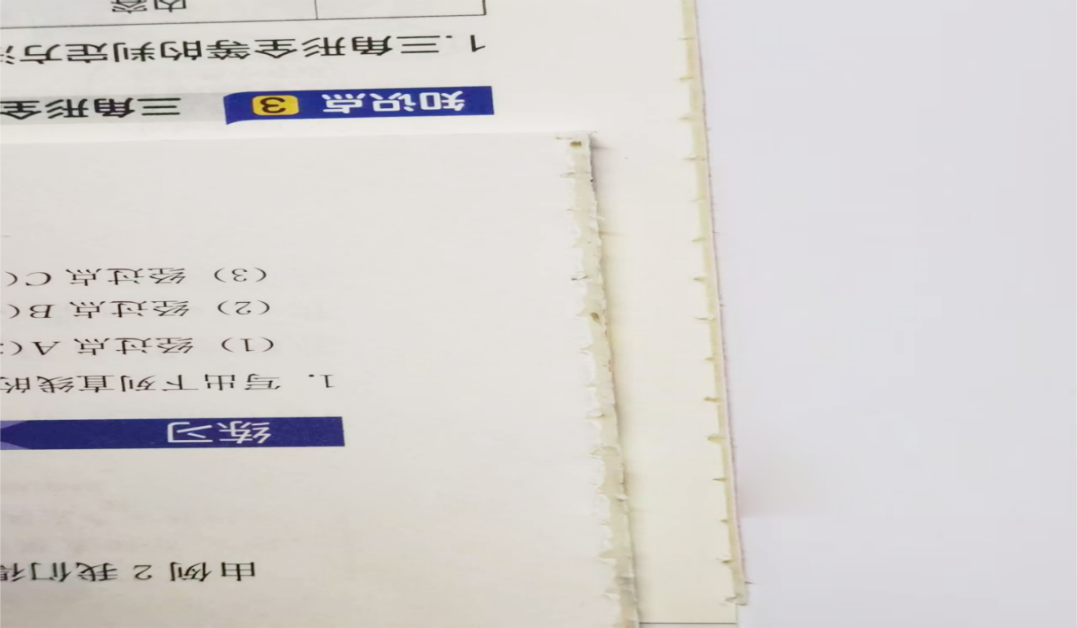 Figure 3: There is a significant difference in the glue layer thickness at the head and tail.
Impact of air bubbles on the quality of glued products
01/ Affecting product appearance
Firstly, it causes the book spine to be overall uneven or locally sunken, affecting the flatness of the spine and the overall aesthetic. Secondly, air bubbles at the head and tail affect the reading experience of customers or readers.
02/ Severe air bubbles affect firmness
Severe air bubbles create hollow glue areas, making the pages easy to separate, reducing firmness, failing tensile tests, and in serious cases causing book spine breakage, loose pages, and other serious quality issues.
03/ Leading to returns and customer complaints
Air bubbles larger than 1mm at the head and tail may lead to customer returns or complaints, and even penalties, affecting the company's reputation. In cases of particularly severe air bubbles, products may be judged as unqualified in quality spot checks, causing serious damage to the company's credibility.
Analysis of the causes of air bubbles in glued products
01/ Improper adjustment of the glue application mechanism
(1) Improper glue temperature control: Too high or too low glue temperature directly affects the fluidity and adhesiveness of hot melt glue, leading to uneven application and affecting the quality of the book block glue. Differences in the number of printed sheets also affect the cooling and solidification time of hot melt glue, so it is necessary to adjust the glue temperature according to seasonal and environmental temperature changes.
(2) Inappropriate height position of the glue roller: If the glue roller is too high or too low, the hot melt glue is distributed unevenly, resulting in hollow glue and affecting the bonding strength of the book.
(3) Inappropriate thickness and viscosity of hot melt glue: The glue layer thickness should be adjusted according to the thickness of the book, typically controlled within the range of 1.0±0.2mm (adjusted as appropriate based on the book block thickness, as shown in Figure 4 where the glue layer is too thin). Improper viscosity of hot melt glue also affects the uniformity of glue application and bonding strength.
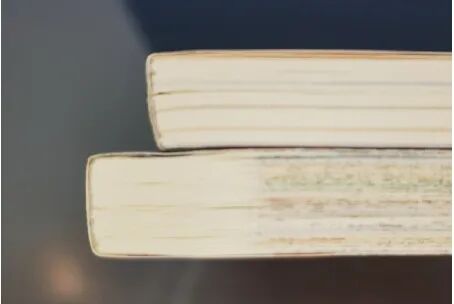
Figure 4 The glue layer is too thin
(4) If the glue roller is not positioned correctly, it will cause areas on the spine of the book to have no glue (as shown in Figure 5).
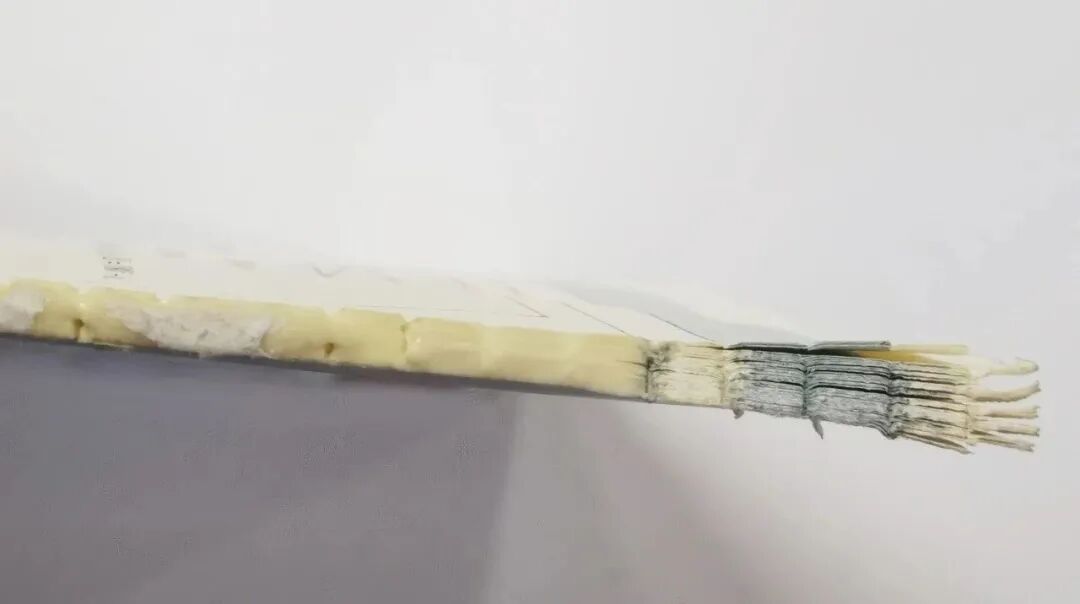 Figure 5 The position where the glue is applied on the roller is inaccurate, and there is no glue at the foot
02/ Improper adjustment of the back milling knife
(1) The cutting edge of the back milling knife is severely worn. If the surface of the book spine after milling is not properly milled, uneven, or has milled fragments, it will affect the quality of the glue application (as shown in Figure 6).
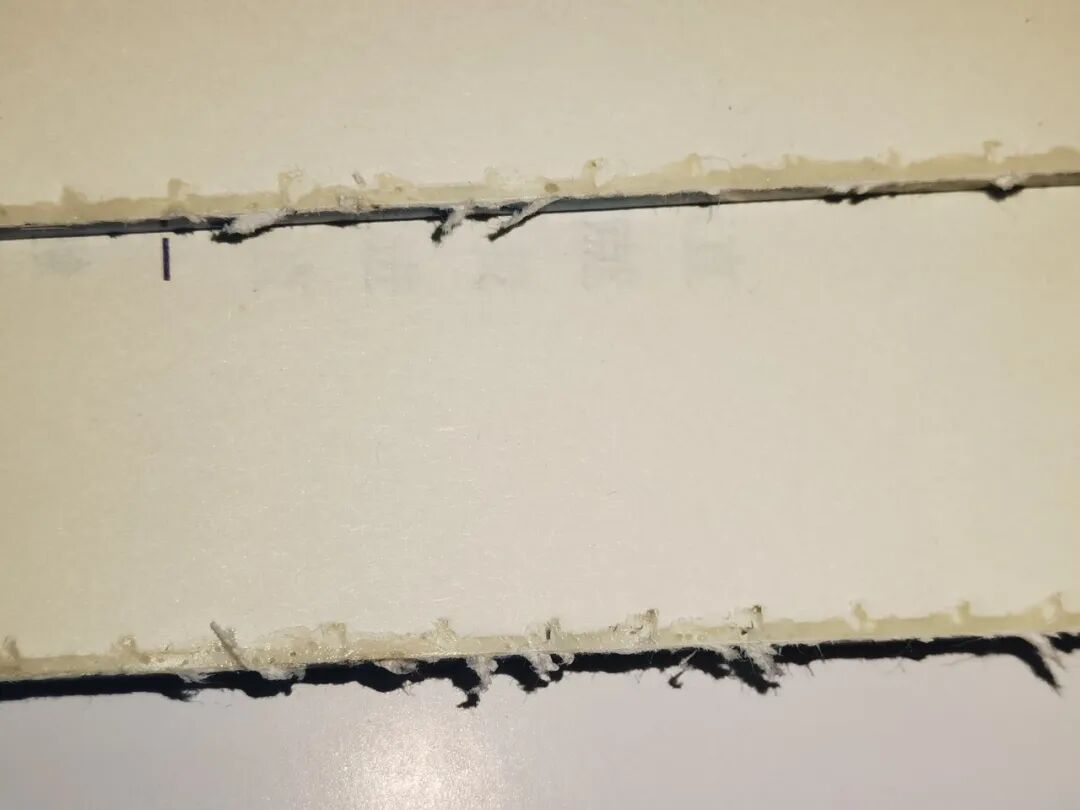 Figure 6: The spine surface of the book is not fully milled
(2) If the gap between the back milling cutter and the pressure plate is too large, it may cause the edge of the book core to lift, resulting in uneven milling backing.
(3) Improper vertical distance adjustment from the horizontal plane of the back milling cutter to the clip edge: If the distance is too large and the exposed part of the staple lacks sufficient tension, it will cause loosening between papers, increasing the penetration depth of hot melt adhesive and increasing the thickness of the spine, resulting in a thickness higher than the cutout, resulting in issues such as bubbles, streaks, and bow wrinkles, which also complicates cutting of finished products; If the distance is too small, it will affect the penetration depth of the hot melt adhesive and the bonding strength.
03/ Inadequate adjustment of the support forming mechanism
(1) Improper height or balance of the support forming mechanism: If all the bubbles appear on the spine of the book, the height of the support forming mechanism needs to be adjusted; If bubbles appear at the top or bottom of the ground, use a level to adjust the balance of the support.
(2) The book clamping action time of the support and hammering mechanism does not match: "Push up first, then clamp later," "Jack up at the same time." If the timing does not match, bubbles may also occur. In such cases, the book clamping action time of the support and hammering mechanism needs to be adjusted.
04/ Improper paper selection and folding
(1) Lightweight paper: Lightweight paper is softer than ordinary offset paper. If the pages are not fully flattened, air pockets may form, which can easily cause hollowing on the back of the book.
(2) Significant disparity in the quantity of cover and body paper: The cover paper should be above 200g/m2, but the body paper should be below 65g/m2, causing the cover to drag on the text after shaping and causing the back to become hollow.
(3) Improper folding and stacking: Improper folding or stacking of pages can cause folds or uneven surfaces (especially curled spines), causing the hot melt adhesive to fail to adhere evenly, resulting in hollowing on the spine.
05/ Improper slot adjustment
(1) If the spacing and depth of the slots do not meet standard requirements, the adhesive on the back of the book may not be properly filled, resulting in hollow spaces.
(2) Severe wear of the grooving knife, uneven depth of grooves on the back of the book, and the hot melt glue is difficult to fill, which affects the quality of glue application (as shown in Figure 7).
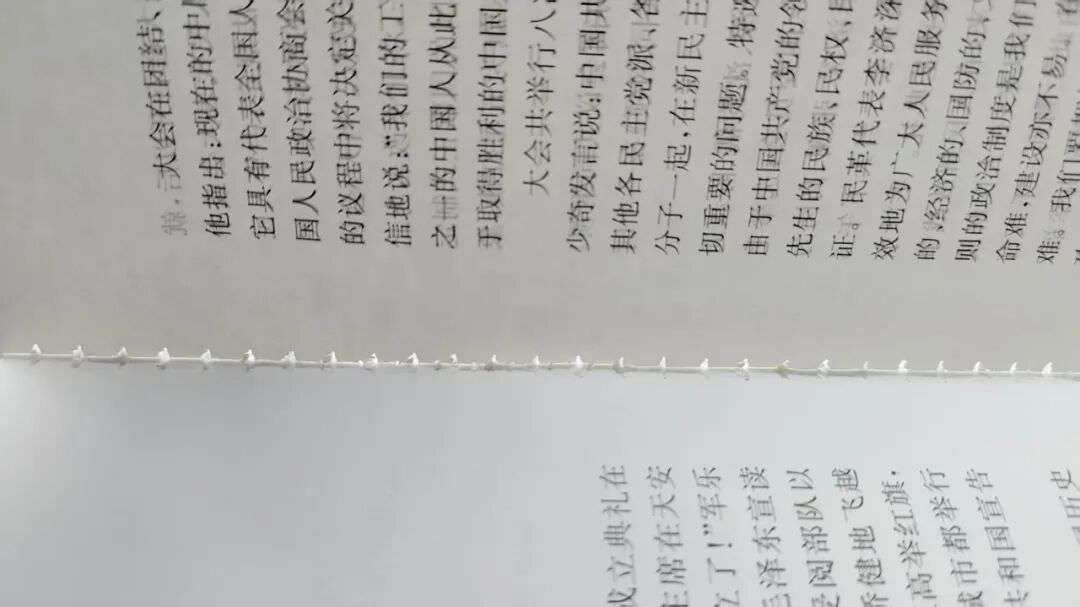 Figure 7: Slotting blades are severely worn, with uneven depths of slots on the back of the book
(3) If the angle between the slotting knife and the back of the book is incorrect, paper scraps and paper fibers may block the slot opening after slotting, preventing hot melt glue from penetrating the slot, resulting in insufficient and uneven glue on the back and causing bubbles on the spine.
06/ Inconsistent clamping force adjustment for book clips
When the clamping force of each clip on the binding machine is inconsistent, the book core inside the clip with too low pressure may be dragged by the milling plate through the milling backing station, causing the milling back to be uneven (tilted). After passing through the slots, the depth of the front and back slots of the book core and spine becomes uneven, resulting in uneven support and support force, which leads to hollow spines.
07/ Improper use of hot melt adhesive
(1) Not selecting the correct hot melt adhesive model based on paper type: Different paper types should be used, such as coated paper, which should be the appropriate type. Do not mix different models of hot melt glue (when changing glue, the glue pot must be cleaned thoroughly), otherwise the adhesive on the back of the book will be uneven, causing bubbles.
(2) Machine speed mismatched with hot melt adhesive: curing time for high-speed adhesive is 3~5 seconds, opening time is 5~7 seconds; Low-speed glue cures for 8~13 seconds and opens for 9~15 seconds. Improper selection of hot melt adhesive, as well as too fast or too slow curing and opening times, can also affect the quality of glue application and cause bubbles.
(3) Unstable quality of hot melt adhesive: Some hot melt adhesives are of poor quality and contain many impurities, which can cause impurities to adhere to the heating rod of the glue pot or clog the rubber pipe or rubber wheel, resulting in uneven glue application and the formation of cavitation.
Solutions for cavitation in adhesive binding products
01/ Optimization and adjustment of glue application mechanism standards
(1) Adjust the glue temperature: Adjust the glue temperature according to the ambient temperature to ensure the temperature difference is controlled within the ±5°C range. For example, in summer, the glue temperature can be set to 160°C, and in winter, it can be raised to 170°C.
(2) Adjust the height of the rubber wheel: Check and adjust the height of the rubber roller and leveling roller to ensure the pressure on the rubber wheel is even and appropriate, avoiding excessive or low pressure.
Recommended for #1 primer pot: No. 1 rubber wheel spacing with book core 0.50~0.80mm; No. 2 rubber wheel spacing with book core 0.80~1.00mm; uniform rubber wheel spacing with book core 0.85~0.90mm.
Recommended for #2 base rubber pot: No. 1 rubber wheel spacing is 0.80~1.00mm; No. 2 rubber wheel spacing is 1.80~2.00mm; uniform rubber wheel spacing is about 2.00mm.
(3) Optimize the thickness and viscosity of the hot melt adhesive: adjust the adhesive thickness according to the thickness of the book, select a stable quality of the adhesive, and adjust the glue roller breaking point. Book thickness, adhesive layer thickness, and explanation references are as follows: Book thickness < 10mm, recommended adhesive layer thickness 0.6~1.0mm; thin books should avoid spine hardening caused by excessive adhesive thickness; book thickness 10~30mm, recommended adhesive thickness 1.0~1.5mm; medium thickness books should balance hot melt adhesive penetration and strength; book thickness >30mm, recommended adhesive layer thickness of 1.5~2.0mm. For thick books, increase the glue to fill the slots, and also use slot pulling technology (groove depth ≥ 1.5mm).
02/ Improvement of the back milling process
(1) Regularly inspect the back milling edge: The inspection standard is that there are no external defects and no passivation at the cutting edge, and the milling effect (backing flatness, roughness) and process parameters (depth consistency) are comprehensively verified. If necessary, sharpening or replacement should be performed (as shown in Figure 8).
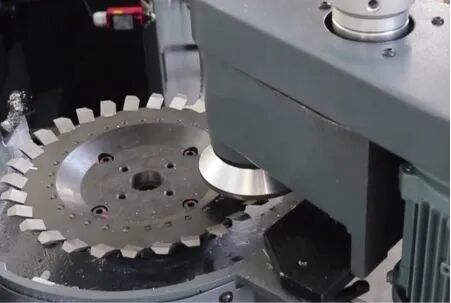
Figure 8 Regularly inspect the milling blade of the book spine
(2) Adjust the clearance between the milling blade and the pressure plate: Adjust the clearance between the front and rear cutter discs and the milling blade to 0.1–0.3 mm (measured with a feeler gauge), not exceeding 0.3 mm, to ensure that the book spine is smooth after milling (as shown in Figure 9).
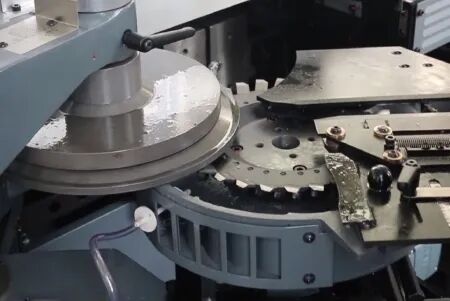
Figure 9 Adjusting the Gap Between the Milling Back Knife and the Press Plate
(3) Correcting the vertical distance from the horizontal surface of the milling back knife to the lower edge of the book clamp: Correctly adjust the part of the book clamp exposed at the book block spine binding; generally, 10mm is recommended. Exposed part at the binding = milling amount + 10mm. If the exposed part at the binding is 13mm, then the milling amount is 3mm.
(4) Milling back depth: The general paper thickness is 1.5–3.0mm (80g/m² paper is about 2.0–2.5mm thick). Use a waste book block for trial milling and check whether the milling back depth is uniform (a depth difference ≤0.1mm is qualified).
03/ Adjustment of the Book Block Forming Mechanism
(1) Adjusting the height of the book block forming mechanism: Adjust the height of the book block forming mechanism according to the amount of book block protrusion. Taking the Cambridge 12000 precision model as an example, stop the milled book block at the zero position above the casing machine. At this time, the casing table is at its highest point, and the distance from the working surface of the guide rail insert to the low pressure plate of the casing table is 138.5mm, with an error within 0.1mm. At this point, the height of the forming mechanism just firmly supports the spine of the book after glue application.
(2) Adjusting the balance of the forming mechanism: Adjust the balance of the forming mechanism according to the air bubbles at the head and tail of the book to ensure that the book spine is formed evenly, with a front-to-back error of 0.1mm (see Figure 10).
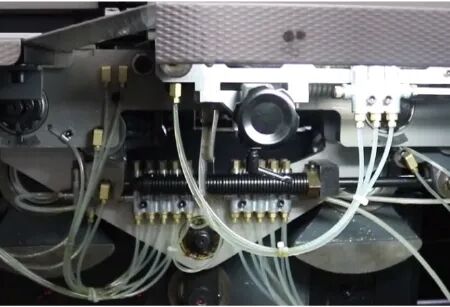 Figure 10 Adjustment of the Binder Forming Mechanism Balance
04/ Paper Optimization Process Measures
(1) Optimization measures for lightweight paper: Lightweight paper needs to be compacted and bundled before binding and placed for more than 8 hours; choose the appropriate hot melt adhesive; appropriately adjust the speed, pressure, and other parameters of the perfect binding machine to ensure the hot melt adhesive is evenly distributed and fully penetrates.
(2) Control of book block flatness: Adjust the upper book platform level to ensure the flatness of the milled back and the depth of the scoring groove, ensuring the book block is neat, without wrinkles or curling.
(3) Communicate with the publisher in advance. When designing and selecting materials, try to avoid using cover and book block papers with a large difference in basis weight. If necessary during design, try to add inserts or interleaves to transition the tension between the two.
05/ Scoring Mechanism Adjustment
(1) Increase the scoring depth to about 1.2mm and ensure the hot melt adhesive fully penetrates the groove.
(2) Control the distance between scores at 5.0–7.0mm.
(3) Regularly check and replace the milling back scoring knife and scoring milling back cutting block on time.
(4) Standard requirements for the scoring groove: distance between grooves 5.0–7.0mm; depth of grooves 1.5±0.5mm.
06/ Book Clamp Clamping Force Adjustment
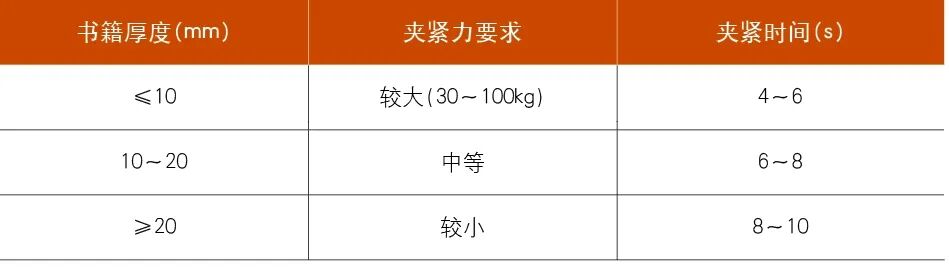
(1) Determine the relationship between book thickness and clamping force, with reference standards as shown in Table 1.
Table 1 Relationship between Book Thickness and Clamping Force
(2) Different devices can detect book thickness data through thickness sensors, and the controller automatically matches the displacement of the clamping plates to precisely control the clamping gap. For example, when a book thickness of 15mm is detected, the clamping plate moves to a gap = 15mm plus glue layer compensation (about 0.5mm). Alternatively, the clamping force of each book clamp can be made consistent by adjusting the torsion spring pressure of each clamp on the host machine.
(3) After clamping, if the book block shrinkage ≤ 2.5mm, it is considered qualified. Randomly inspect the book spine for defects such as wrinkles, bubbles, exposed glue, or glue overflow.
Solving the void problem in perfect-bound products requires addressing multiple aspects, including equipment, process, materials, and operation. Through systematic analysis and optimization, the stability of perfect-bound product quality can be effectively improved. The solutions described in this article have been verified in actual production and are intended to provide ideas for peers in solving issues in the wireless perfect binding process, and they offer reference value for perfect binding machine operators and quality engineers.